

Want an AI companion to join you in Minecraft? This guide uses Mindcraft v0.1.4, a project that connects language models to the game through Mineflayer. It can run multiple agents too, but I'd start with one: multi-agent compatibility was less reliable in my experience.
1. Prepare Minecraft, an API key and Node.js
You need:
- Minecraft Java Edition in a version compatible with this release. The v0.1.4 README recommends 1.21.6.
- An API key from a supported provider. The example below uses DeepSeek.
- Node.js and npm.
A local model is another option; see my Windows Ollama guide. Running Minecraft and a local model together needs more hardware, and smaller models may struggle with the tasks. An API is the simpler starting point here.
Node.js version note: the original Chinese tutorial used 20.20.2, which the official download page now marks as end of life. Node.js 22 LTS is a maintained starting point and meets Mineflayer 4.33.0's declared Node.js 22-or-newer requirement. Mindcraft's older runtime advice conflicts with that dependency requirement, and its README warns of native dependency problems on Node.js 24+. Native builds can still vary by platform; this is not a fresh installation test.
Install Node.js from the official site and open a new terminal afterwards. If the installer requests a restart, follow that prompt.
2. Download the project and install dependencies
Open the Mindcraft v0.1.4 release, download its source ZIP and extract it. The folder containing main.js, package.json, andy.json and settings.js is the project root:
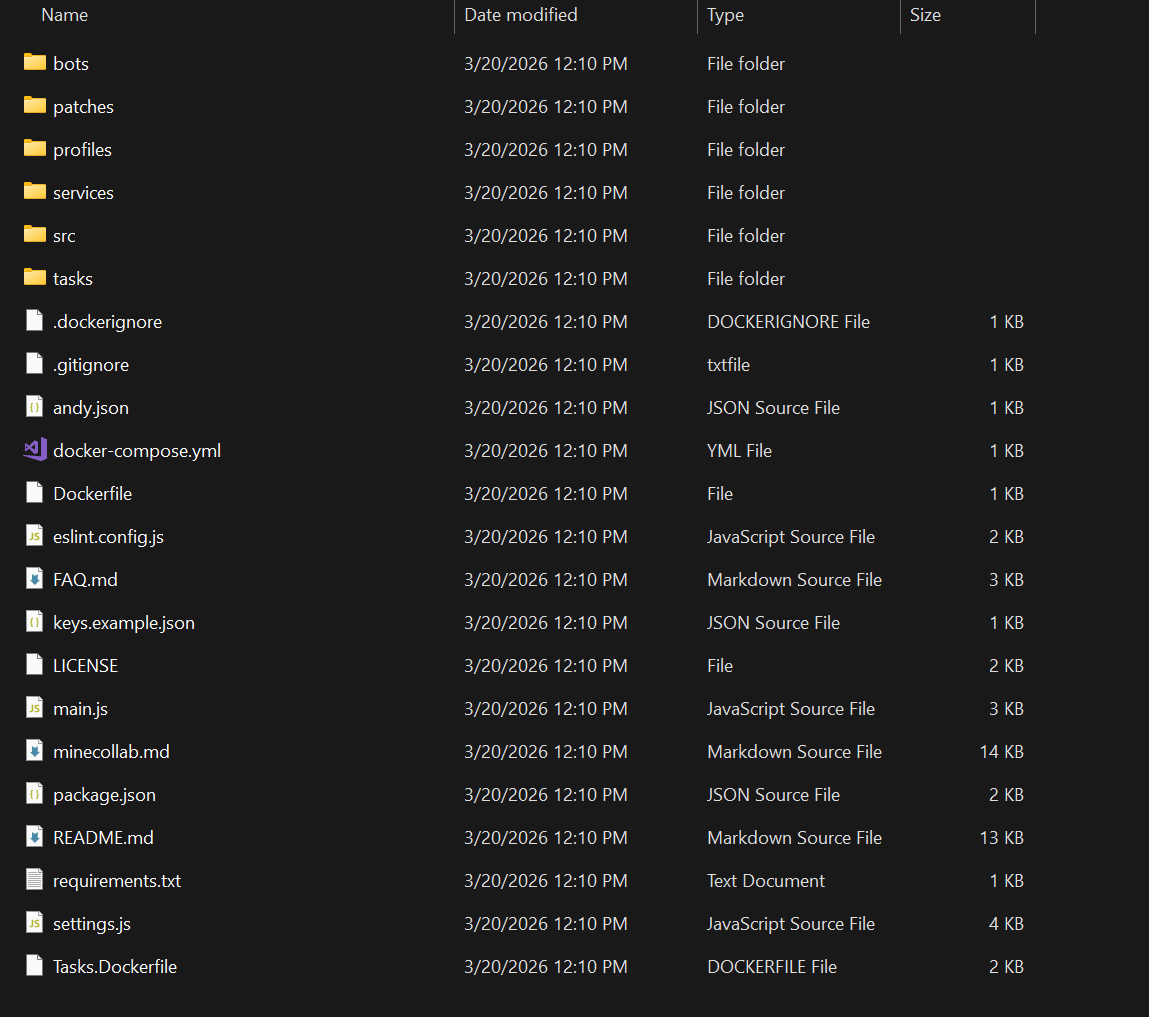
Open Command Prompt or a terminal in that folder, then run:
npm install
This downloads the project's dependencies. Native build errors should be checked against the release-specific FAQ, while keeping the runtime-version caveat above in mind.
3. Add your DeepSeek key
Open the file keys.example.json, put your key in DEEPSEEK_API_KEY, and save it as keys.json in the project root. Both filenames use the plural keys.
{
    "OPENAI_API_KEY": "",
    "OPENAI_ORG_ID": "",
    "GEMINI_API_KEY": "",
    "ANTHROPIC_API_KEY": "",
    "REPLICATE_API_KEY": "",
    "GROQCLOUD_API_KEY": "",
    "HUGGINGFACE_API_KEY": "",
    "QWEN_API_KEY": "",
    "XAI_API_KEY": "",
    "MISTRAL_API_KEY": "",
    "DEEPSEEK_API_KEY": "YOUR_DEEPSEEK_API_KEY",
    "GHLF_API_KEY": "",
    "HYPERBOLIC_API_KEY": "",
    "NOVITA_API_KEY": "",
    "OPENROUTER_API_KEY": "",
    "CEREBRAS_API_KEY": "",
    "MERCURY_API_KEY": ""
}
Replace the placeholder with your own key. Only the provider you use needs a key; keep your completed keys.json private.
Next, open andy.json and use:
{
  "name": "andy",
  "model": "deepseek/deepseek-flash"
}
The first part selects Mindcraft's DeepSeek adapter, and deepseek-flash is the model identifier listed in the official DeepSeek API documentation.
Keep a Minecraft-compatible bot name such as andy. For Microsoft-authenticated servers, the project requires it to match the bot account's Minecraft profile name.
4. Configure the local connection
The configuration file is settings.js, a JavaScript file. In its existing settings object, update or confirm these entries, keeping the rest of the file:
"host": "127.0.0.1",
"port": 55916,
"auth": "offline",
"profiles": ["./andy.json"],
"language": "en",
"allow_insecure_coding": false,
This example connects the bot to Minecraft on the same computer, using the project's local offline-authentication setup. Authenticated online servers require the project's Microsoft account setup instead.
Keep allow_insecure_coding set to false for this beginner setup. The project's warning explains that enabling it lets the model generate and execute code on the computer; it should not be used on public servers with that feature enabled.
5. Open a world to LAN and start the bot
Start Minecraft, create a local test world and choose Open to LAN. Use port 55916, matching settings.js. If Minecraft assigns another port, put that number in the configuration.
From the project root, run:
node main.js
Once the agent connects, you can talk to it in the in-game chat.
Language, limits and common problems
- Language:
languageis insettings.js;enis used above. Machine-translated messages can sound awkward. - Connection refused: check that LAN is enabled, the ports match, and the Minecraft version is supported.
- Missing key: check the exact filename
keys.json, save the file, and start from the project root. - Reply limits:
max_messagesinsettings.jscontrols retained chat history. A provider's output-token parameter, such asmax_tokens, belongs in the profile model object'sparams; the simple string model example above can be expanded to that format using the README.
My own usage was fairly modest, but the total depends on the model, conversation length and how many agents keep making requests.
Adapted from the original Chinese tutorial, published on October 21, 2026. Filenames, configuration fields and model naming were checked against the tagged source; the Node.js guidance was updated for current support status. The translation did not involve installing Mindcraft or making model calls.
Comments NOTHING